SUID gotcha

SUID allows an executable to be run with the permissions of the owner of that executable file. However this does not work for bash scripts (*.sh)

A workaround implies writing a short C program that calls the bash script.

#include <stdio.h>
#include <stdlib.h>
#include <sys/types.h>
#include <unistd.h>

int main()
{
   setuid( 0 );
   system( "/tmp/suid_test_script" );

   return 0;
}

then compile

gcc -o <destination executable> <source code> 

Storage in Windows 2012R2

Storage Management is an important topic for MCSA 70-410 exam and it is worth being clear about what various concepts mean and their relevance to day to day practice.

This article talks in a bit more detail of how Microsoft has moved on in the storage area. Sure there will be situations where the extra SAN feature will be desirable and entirely justified, however I think that for most run of the a mill use cases, you will find it hard to justify the SAN expenditure. Most of the time it comes down how happy you are with your support provider and the fact that many IT houses simply don’t have the guts to go for something radical like Windows Storage Spaces.

You might want to give the following article a thorough read. You will find in there a mention of JBOD.
However it is worth observing that any storage is ultimately JBOD, just a bunch of disks.
As a simple summary we have the following options for configuring storage in Windows 2012R2 (as far as I have been able to figure things out)
DiskVolumes
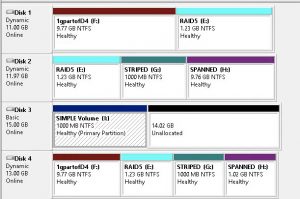
Storage Volumes: created through ‘Disk Management

types of volumes:

  • Simple:
    • only possible on one disk (if you extend it on other dynamic disks, we have a spanned volume)
    • no fault tolerance
  • Spanned
    • up to 32 disks
    • no fault tolerance
  • Stripped
    • up to 32 disks
    • no fault tolerance
  • Mirrored
    • fault tolerance, allows for 1 disk failure
    • you can only have 2 disks in one mirrored disk volume
  • Raid5
    • at least 3 but no more than 32 disks (it will be interesting to see what number of disks gives you optimal performance in a Windows Raid5 Storage Volume, if this would be indeed a factor)
    • fault tolerance, allows for 1 disk failure (and only 1 irrespective of the number of physical disks in the volume)
    • ***rebuild time is VERY slow (I’ve tried it on 1GB volume) and I simply can’t imagine a production scenario where you would want to create a RAID5 volume in this way.

Storage Spaces: created in ‘File and Storage Services’ in Server Manager (same as Disk Volumes, only that there is another layer of abstraction – virtual disks that are created in this “soup” of disk space (storage pool)
So the storage ‘soup’ is called by Microsoft a storage pool. It really means exactly that a pool of storage, any storage.
Then you create your disks (virtual of course) for which, depending on the number and type of the physical disks involved (e.g. HDD and SSD, or just HDD), you get various options:

  • Simple – basically a stripe.
  • Mirror
    • two way mirror, requires minimum 3 disks, protects from 1 disk failure
    • three way mirror, requires minimum 5 disks, protects from 2 disks failure
  • Parity
    • single parity, requires 3 disks,  protects from 1 disk failure
    • dual parity requires 7 disks, protects from 2 disks failure

Microsoft confusing people, one of perils of closed source, I guess....
Microsoft confusing people, one of perils of closed source, I guess…. you definitely need seven disks for a dual parity virtual disk. In fact try it doing this on a 5 disk storage pool, you won’t even get the [Resiliency Setting] option

As an aside, [column count] (number of disks in a stripe) is a concept used in calculating how many disks you want in your Storage Space. This technet article gives a lot of detail and has a very useful table showing all you practically need to know to plan your storage. But the upshot of that is as I see it, if you want fault tolerance best to have ‘hot spares‘ or is it? Don’t expect your hot spares to become operational in an instant though.

From what I’ve seen in practice and understood from the literature, protection from failure, does not mean your data is going to remain online and available, it only means exactly that, protected, but possible offline. Not quite what you might have been used to when talking about fault tolerance, but here we go, take that as a warning. I didn’t have the time for a comprehensive test of options, but as far as the dual parity is concerned (the one that is supposed to protect from 2 drive failures), failing two drives will result in your disk becoming detached (unaccessible). Yes you can bring a different disk into the Storage Pool and your drive will automagically came back, so I guess your data has been protected from from the two disks failing afterall. However protection does not mean availability as one might be tempted to assume.

install oVirt 3.6 on Centos 7

I needed a quick set-up for some lab virtual machines so I used a laptop I had  and played with oVirt 3.6 over the past few days and things look promising. In then end after experimenting with Vmware ESX on the  laptop I settled with VirtualBox running in Centos7.

This is my walkthrough as I was installing oVirt 3.6, running everything on a single 1tb hard disk. They are my working notes using mainly https://glennsnead.wordpress.com/2016/02/28/ovirt-3-6-installation/

First install Centos7 minimal install, ensure that the network interface is on (off by default), you will need at least 10Gb in /var/tmp.

(optional) update to the latest available version:

# yum -y update

check the hostname:

hostnamectl status
hostnamectl set-hostname [new host name]

edit /etc/hosts file and add the entries for the host and engine:

# vi /etc/hosts
# systemctl restart systemd-hostnamed

disable NetworkManager:

# service NetworkManager stop
# chkconfig NetworkManager off
# service network start
# chkconfig network on

add correct gpg key for glusterfs:

# yum install -y wget
# wget http://download.gluster.org/pub/gluster/glusterfs/LATEST/CentOS/rsa.pub
# rpm –import ./rsa.pub
# rm -f ./rsa.pub

install required apps (this will take a while):

# yum localinstall -y http://resources.ovirt.org/pub/yum-repo/ovirt-release36.rpm
# yum install -y ovirt-hosted-engine-setup screen glusterfs-server nfs-utils vdsm-gluster system-storage-manager mailx
# yum install -y ovirt-engine-appliance

create a partition for the glusterfs storage

# fdisk /dev/sda
………
# partprobe

list all partitions:

# lsblk

set-up gluster:

# pvcreate /dev/sda6
# ssm add -p vg_gluster /dev/sda6
# ssm create -p vg_gluster –fstype xfs -n lv_gluster

Add line to /etc/fstab:  /dev/mapper/vg_gluster-lv_gluster  /gluster  defaults  0 0

# mkidr /gluster
# mount /gluster
# mkdir -p /gluster/{data,engine,iso}/brick
# systemctl start glusterd && systemctl enable glusterd

Create the gluster “bricks”

# gluster volume create engine $HOSTNAME:/gluster/engine/brick
# gluster volume create data $HOSTNAME:/gluster/data/brick
# gluster volume create iso $HOSTNAME:/gluster/iso/brick
# gluster volume set engine group virt
# gluster volume set engine storage.owner-uid 36 && gluster volume set engine storage.owner-gid 36
# gluster volume set data group virt
# gluster volume set data storage.owner-uid 36 && gluster volume set data storage.owner-gid 36
# gluster volume set iso group virt
# gluster volume set iso storage.owner-uid 36 && gluster volume set iso storage.owner-gid 36

Start the Gluster volumes

# gluster volume start engine && gluster volume start data && gluster volume start iso

Check the Gluster volume status and availability

# gluster volume status
# showmount -e $HOSTNAME

deploy ovirt engine:

# hosted-engine –deploy


*** In case the engine deployment fails and you want to run it again, you can simply delete the host:/engine volume and recreate it.

# gluster volume stop engine
# gluster volume delete engine
# rm -rf /gluster/engine

and then recreate it as per above


error connecting to EMS on exchange server – The WinRM client cannot process the request

Connecting to remote server failed with the following error message : The WinRM client cannot process the request. It cannot determine the content type of the HTTP response from the destination computer. The content type is absent or invalid. For more information, see the about_Remote_Troubleshooting Help topic.     + CategoryInfo          : OpenError: (System.Manageme….RemoteRunspace:RemoteRunspace) [], PSRemotingTransportExc    eption     + FullyQualifiedErrorId : PSSessionOpenFailed


check: https://localhost/powershell

if it says module WinRM not found, edit C:WindowsSystem32InetsrvconfigApplicationHost.config file.

insert         <add name=”WSMan” image=”C:Windowssystem32wsmsvc.dll” />

under <globalmodules> section

may need to restart iis (iisreset in commandline). When running EMS it may take a while before finally connecting, then it’s plain sailing.

dns fails registration in windows 2008r2 cluster

taken from: http://jaminquimby.com/joomla253/servers/81-windows-server/windows-server-2008-r2/473-cluster-name-resource-failed-registeration-in-dns


In DNS Management (dnsmgmt.msc):

  1. Find the VirtualClusterName that is failing to register.
  2. Right-Click Properties.
  3. Select Security Tab.
  4. Click Add.
  5. Click Object Types.
  6. Check off “Computers“; uncheck other options selected.
  7. Enter in the name of the cluster (a.k.a Cluster Name Object (CNO)).
  8. Click Check Names; Verify that the entry has been found.
  9. Click OK.
  10. Give the CNO FULL Control over this record.
  11. Click OK.

loading and unloading peformance counter in Exchange 2010

To unload performance counters for ESE, perform the following steps:

  • Close down any running versions of Performance Monitor and stop any other monitoring services that might be attempting to use those counters
  • Open the Exchange Management Shell
  • Type add-pssnapin Microsoft.Exchange.Management.PowerShell.Setup and hit enter
  • Type remove-perfcounters –definitionfilename “C:Program FilesMicrosoftExchange ServerV14BinperfAMD64eseperf.xml” and hit enter
    Note: Ensure that the path is changed to the correct location of eseperf.xml on your server

To reload performance counters for ESE, perform the following steps

  • Close down any running versions of Performance Monitor and stop any other monitoring services that might be attempting to use those counters
  • Open the Exchange Management Shell
  • Type add-pssnapin Microsoft.Exchange.Management.PowerShell.Setup and hit enter
  • Type new-perfcounters –definitionfilename “C:Program FilesMicrosoftExchange ServerV14BinperfAMD64eseperf.xml” and hit enter
    Note: Ensure that the path is changed to the correct location of eseperf.xml on your server

http://blogs.technet.com/b/mikelag/archive/2010/09/10/how-to-unload-reload-performance-counters-on-exchange-2010.aspx

Windows System Image Manager – Windows 2012 server – GB gotchas

WSIM is used to create an xml file which can be used to automate installations of Windows 2012 servers.
The default settings (the ones that you may find in official documentation) are heavily biased towards US.
Here there are the settings that will get you going if you need to use the GB locales:

Components->[windowsPE->amd64_Microsoft-Windows-International-Core-WinPE__neutral

InputLocale: 0809:00000809
SystemLocale: en-GB
UILanguage: en-US
UserLocale: en-GB

Components->[windowsPE->amd64_Microsoft-Windows-International-Core-WinPE__neutral->SetupUILanguage
UILanguage: en-GB

Components->Specialize->amd64_Microsoft-Windows-Shell-Setup__neutral
TimeZone: GMT Standard Time

Capture1